Not every space can take a room of reformers. A small studio, a clinic treatment room or a hotel gym may have only a few square metres to spare. A spring wall brings Pilates spring work into that space. It mounts on the wall, takes almost no floor area and leaves the room free for other uses between sessions.
This article explains what a spring wall is, where it fits best, how to plan the wall and the floor in front of it, and how to use several units for small group classes.
What a spring wall is
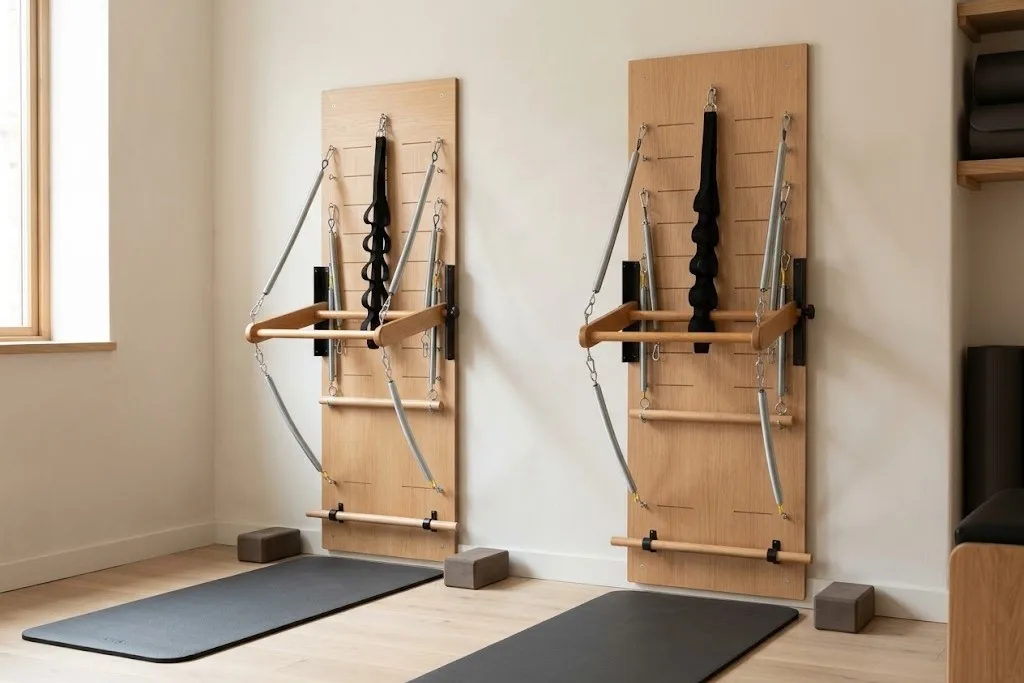
A spring wall is a panel fixed to the wall, with attachment points for springs and accessories at different heights. The client works on a mat in front of it, lying, sitting, kneeling or standing, with springs providing resistance or assistance.
It borrows from the tower, or wall unit, which combines elements of the reformer, the Cadillac and mat work. The spring wall takes that idea and reduces it to the essentials.
As an example, the Round Fit Studio Pro Spring Wall is 60 cm wide, 183 cm high and only 10 cm deep. It is a plywood panel on a hardwood frame, with eight colour-coded steel springs. Plywood suits the panel because it stays flat and stable across its width. The hardwood frame carries the loads into the wall fixings.
Where it fits best
A spring wall is most useful where floor space is scarce or where the room has other uses:
- Small studios adding spring work alongside mat classes.
- Clinic treatment rooms, where a physiotherapist needs spring-assisted exercise without giving up the plinth.
- Hotel and club gyms, where a full reformer would be used only occasionally.
- Multi-use rooms that host yoga, barre or stretching classes at other times.
The floor in front
The panel takes almost no floor area, but the client still needs a mat-sized space in front of it. Studio design guides commonly suggest roughly 40 to 50 square feet (about 3.7 to 4.6 m²) per mat. Allow enough length for a client lying with their head or feet towards the wall, and enough width for arm and leg work to the side.
Keep that zone clear of other equipment. Springs and straps extend well beyond the panel, and clients move in several directions.
The wall
A spring wall is only as safe as the wall it is fixed to. Springs pull outwards and downwards, often suddenly. The wall and the fixings must carry those loads with a good margin.
- Wall type. Solid masonry or concrete is the best base. Stud walls usually need added structure, such as a plywood backing fixed into the studs or a separate frame.
- Fixings. In the UK, BS 8539 is the code of practice for selecting, installing and testing anchors in concrete and masonry. Its approach is that the specifier should assess the anchor’s suitability and write an unambiguous specification, and that the installer should use the specified anchor with the correct tools and have each anchor inspected before load is applied.
- Fixings into timber. The Wood Handbook from the US Forest Products Laboratory notes that screw withdrawal resistance rises with the square of the wood’s specific gravity, and that screws in end grain hold only about 75 per cent of their side-grain value. Frame fixings should go into side grain of dense hardwood.
Round Fit installs through local distribution partners, who assess the wall before fitting.
Several units for small groups
A row of spring walls can run a small group class. Each client has their own panel and mat. Compared with a room of reformers, the same number of clients needs far less floor area, and the room is clear once the mats are put away.
When planning a row:
- Space units so clients’ arms and legs do not overlap when working to the side.
- Fix each unit independently.
- Keep a clear walkway behind the mats, so the instructor can move along the row.
- Mount units at the same height, so cues are the same for everyone.
Springs and maintenance
Springs are working parts under repeated load. They should be checked regularly for gaps between coils, distortion and wear at the ends, and replaced on a schedule rather than only when they fail. Colour coding helps instructors set the same load every time and makes it easy to spot a missing or misplaced spring.
Matching the room
A spring wall is very visible, because it sits at eye level on a wall. Built in the same timber and finish as other equipment and joinery in the room, it looks like part of the interior rather than a piece of gym hardware.
See the Studio Pro Spring Wall in our Pilates collection. If you are considering one for your space, send us a photo and dimensions.