Wall bars look simple. A pair of uprights, a set of rungs and a few fixings into the wall. But in use they carry the full weight of a person hanging, stretching, climbing or pulling, often with sudden, dynamic loads. In a commercial room they do that many times a day, for years.
That makes wall bars one of the pieces of equipment where specification matters most. This article covers the timber, the configuration, the wall fixing and the space around the bars.
The relevant standard
In Europe, wall bars are covered by EN 12346, published in the UK as BS EN 12346:1999. Its full title is “Gymnastic equipment. Wall bars, lattice ladders and climbing frames. Safety requirements and test methods”. BSI lists it as current. Its subject descriptors include design, dimensional tolerances, loading, mechanical and torsion testing, strength of materials, marking and instructions for use.
The standard was written for gymnastic equipment, but it is a sensible reference for any commercial installation. Ask your supplier whether their design follows it, and what testing has been done.
Timber for rungs and stiles
Rungs are gripped, stood on and hung from. They take bending loads and twisting loads, and they are knocked. Stiles, the vertical uprights, hold the rungs and carry the loads into the wall fixings.
The best timbers are dense, straight-grained hardwoods. The Wood Database gives useful comparisons:
- European ash has an elastic modulus of 12.31 GPa and a modulus of rupture of 103.6 MPa. It is described as having fairly good strength for its weight and as shock resistant. Those qualities explain its long use in tool handles and sports equipment, and they suit rungs well.
- European beech is stiffer, at 14.31 GPa, with a modulus of rupture of 110.1 MPa. It has a fine, even texture that feels smooth in the hand. It moves more with humidity than ash, so it needs careful detailing in rooms with large humidity swings.
Whatever the species, grain matters. The rung should be cut so the grain runs straight along its length. Short grain or knots at the point where the rung meets the stile create a weak spot.
Joints between rungs and stiles
Rungs are usually set into holes or mortises in the stiles. This joint must stay tight for the life of the bars.
The US Forest Products Laboratory’s Wood Handbook explains why that is not automatic. Fixings in wood that goes through repeated wetting and drying can lose a large part of their withdrawal resistance. Timber that is not fully dried when it is machined can shrink and loosen around a joint. A good maker dries timber properly, cuts joints precisely and finishes all faces so moisture exchange is slow.
Configuration
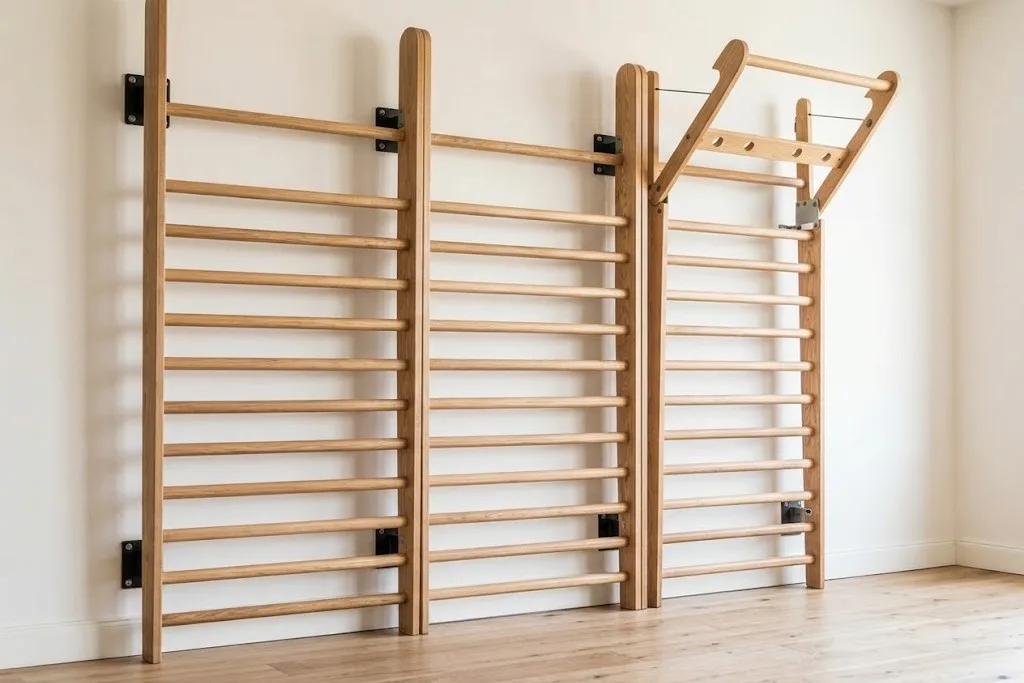
Wall bars come in several layouts. The right one depends on the room and the users:
- Single section. One bay, for a small studio or a clinic treatment room.
- Multiple sections. Several bays side by side, for group classes. Each bay should be independently fixed.
- Pull-up bar. A projecting bar at the top, for hanging and pulling. It adds leverage on the fixings and must be designed for it.
- Rung spacing. Even spacing suits general training. Physiotherapy and rehab rooms may need different spacing or extra rungs at particular heights.
- Height. Floor-to-ceiling bars suit gyms. Lower bars may suit clinics or rooms with low ceilings.
If the bars will be used for rehabilitation, involve a qualified physiotherapist in the specification. They will know which heights and spacings their programmes need.
Fixing to the wall
The fixing is where many installations go wrong. The bars may be strong, but they are only as safe as the anchors that hold them.
Start with the wall. Solid concrete, solid brick, hollow block, timber stud and metal stud with plasterboard all need different approaches. Some walls are not suitable for wall bars at all without added structure.
In the UK, BS 8539 is the code of practice for the selection, installation and testing of anchors in concrete and masonry. The standard’s approach is clear. The specifier should assess the anchor’s suitability and write an accurate, unambiguous specification. Any substitution should go through the same selection process. The installer should use the specified anchor and the correct tools, and should have each anchor inspected before load is applied. Site testing should follow the regime set out in the standard.
The fixings into the timber stiles matter too. The Wood Handbook notes that screw withdrawal resistance rises with the square of the wood’s specific gravity, which favours dense hardwoods. Screws in end grain hold only about 75 per cent of their side-grain value. Stile fixings should go into side grain, with properly sized pilot holes.
Round Fit installs through local distribution partners, who assess the wall before fitting.
Clearance and safe space
Wall bars need room around them. Users swing, step back, lean out and drop down. A sensible plan allows for:
- Clear floor space in front of the bars, free of other equipment.
- Side clearance between bays and to adjacent walls or mirrors.
- Suitable flooring below, firm enough for standing work but forgiving if someone drops from a low height.
- Nothing projecting from the wall nearby, such as radiators, shelves or door handles.
Mirrors close to wall bars should be safety glass and properly framed.
Finish and grip
Rungs need a finish that is smooth but not slippery. A heavily built gloss film can feel slick, especially with chalk-free hands or sweat. A matt lacquer gives good protection with a natural feel. The finish should cover the rung ends inside the stile holes too, where moisture can enter through end grain.
A specification checklist
- Timber species for rungs and stiles, with straight grain.
- Number of bays, height and rung spacing.
- Pull-up bar or other attachments.
- Wall type and the fixing method, specified under BS 8539.
- Clearance plan and flooring.
- Finish, including rung ends.
- Testing and the standard the design follows.
To plan a layout, try our wall bars configurator, or send us your wall dimensions.